前言
上一篇【.Net Core微服务入门全纪录(四)——Ocelot-API网关(上)】已经完成了Ocelot网关的基本搭建,实现了服务入口的统一。当然,这只是API网关的一个最基本功能,它的进阶功能还有很多很多。
服务发现
首先需要解决的就是服务发现的问题,服务发现的优点之前讲过,就不说了。
上一篇中我们的服务地址都是写在ocelot.json配置文件里,现在我们需要结合之前的Consul来实现服务发现。
- 改造代码:
首先NuGet安装Ocelot.Provider.Consul:

修改Startup.cs:
        public void ConfigureServices(IServiceCollection services)
        {
            //添加ocelot服务
            services.AddOcelot()
                .AddConsul();//添加consul支持
        }
修改ocelot.json配置:
{
  "Routes": [
    {
      "DownstreamPathTemplate": "/products",
      "DownstreamScheme": "http",
      "UpstreamPathTemplate": "/products",
      "UpstreamHttpMethod": [ "Get" ],
      "ServiceName": "ProductService",
      "LoadBalancerOptions": {
        "Type": "RoundRobin"
      }
    },
    {
      "DownstreamPathTemplate": "/orders",
      "DownstreamScheme": "http",
      "UpstreamPathTemplate": "/orders",
      "UpstreamHttpMethod": [ "Get" ],
      "ServiceName": "OrderService",
      "LoadBalancerOptions": {
        "Type": "RoundRobin"
      }
    }
  ],
  "GlobalConfiguration": {
    "BaseUrl": "http://localhost:9070",
    "ServiceDiscoveryProvider": {
      "Scheme": "http",
      "Host": "localhost",
      "Port": 8500,
      "Type": "Consul"
    }
  }
}
这个配置应该很好理解,就是把我们上次的DownstreamHostAndPorts节点去掉了,然后增加了ServiceDiscoveryProvider服务发现相关配置。
注意,Ocelot除了支持Consul服务发现以外,还有Eureka也可以,Eureka也是一个类似的注册中心。
好了,代码修改就差不多了,下面运行程序测试一下:

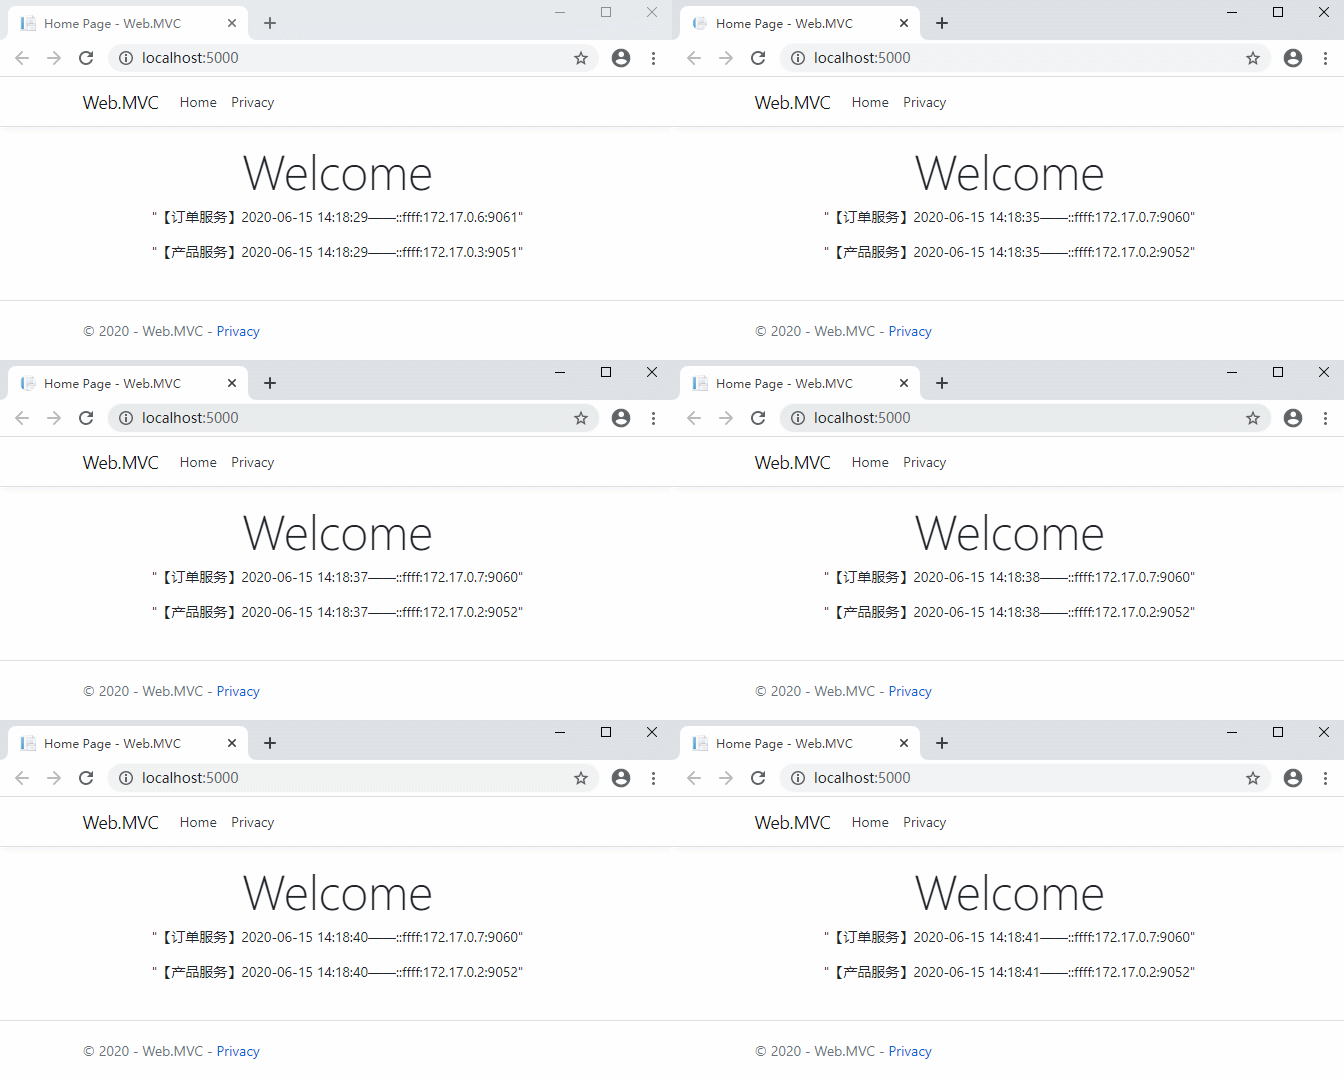
客户端正常运行。
至此我们就实现了服务注册与发现和api网关的基本功能。接下来就要提到:服务治理
服务治理
其实服务治理也没有一个非常明确的定义。它的作用简单来说,就是帮助我们更好的管理服务,提升服务的可用性。——缓存,限流,熔断,链路追踪 等等。。。都属于常用的服务治理手段。
之前讲的负载均衡,服务发现也可以算是服务治理。
- 缓存:
在Ocelot中启用缓存,需要NuGet安装一下Ocelot.Cache.CacheManager:

修改Startup.cs中的ConfigureServices()方法:
//添加ocelot服务
services.AddOcelot()
    //添加consul支持
    .AddConsul()
    //添加缓存
    .AddCacheManager(x =>
    {
        x.WithDictionaryHandle();
    });
修改ocelot.json配置文件:
{
  "Routes": [
    {
      "DownstreamPathTemplate": "/products",
      "DownstreamScheme": "http",
      "UpstreamPathTemplate": "/products",
      "UpstreamHttpMethod": [ "Get" ],
      "ServiceName": "ProductService",
      "LoadBalancerOptions": {
        "Type": "RoundRobin"
      },
      "FileCacheOptions": {
        "TtlSeconds": 5,
        "Region": "regionname"
      }
    },
    {
      "DownstreamPathTemplate": "/orders",
      "DownstreamScheme": "http",
      "UpstreamPathTemplate": "/orders",
      "UpstreamHttpMethod": [ "Get" ],
      "ServiceName": "OrderService",
      "LoadBalancerOptions": {
        "Type": "RoundRobin"
      },
      "FileCacheOptions": {
        "TtlSeconds": 5,
        "Region": "regionname"
      }
    }
  ],
  "GlobalConfiguration": {
    "BaseUrl": "http://localhost:9070",
    "ServiceDiscoveryProvider": {
      "Scheme": "http",
      "Host": "localhost",
      "Port": 8500,
      "Type": "Consul"
    }
  }
}
在Routes路由配置中增加了FileCacheOptions。TtlSeconds代表缓存的过期时间,Region代表缓冲区名称,这个我们目前用不到。
好了,代码修改完需要编译重启一下网关项目,然后打开客户端网站测试一下:
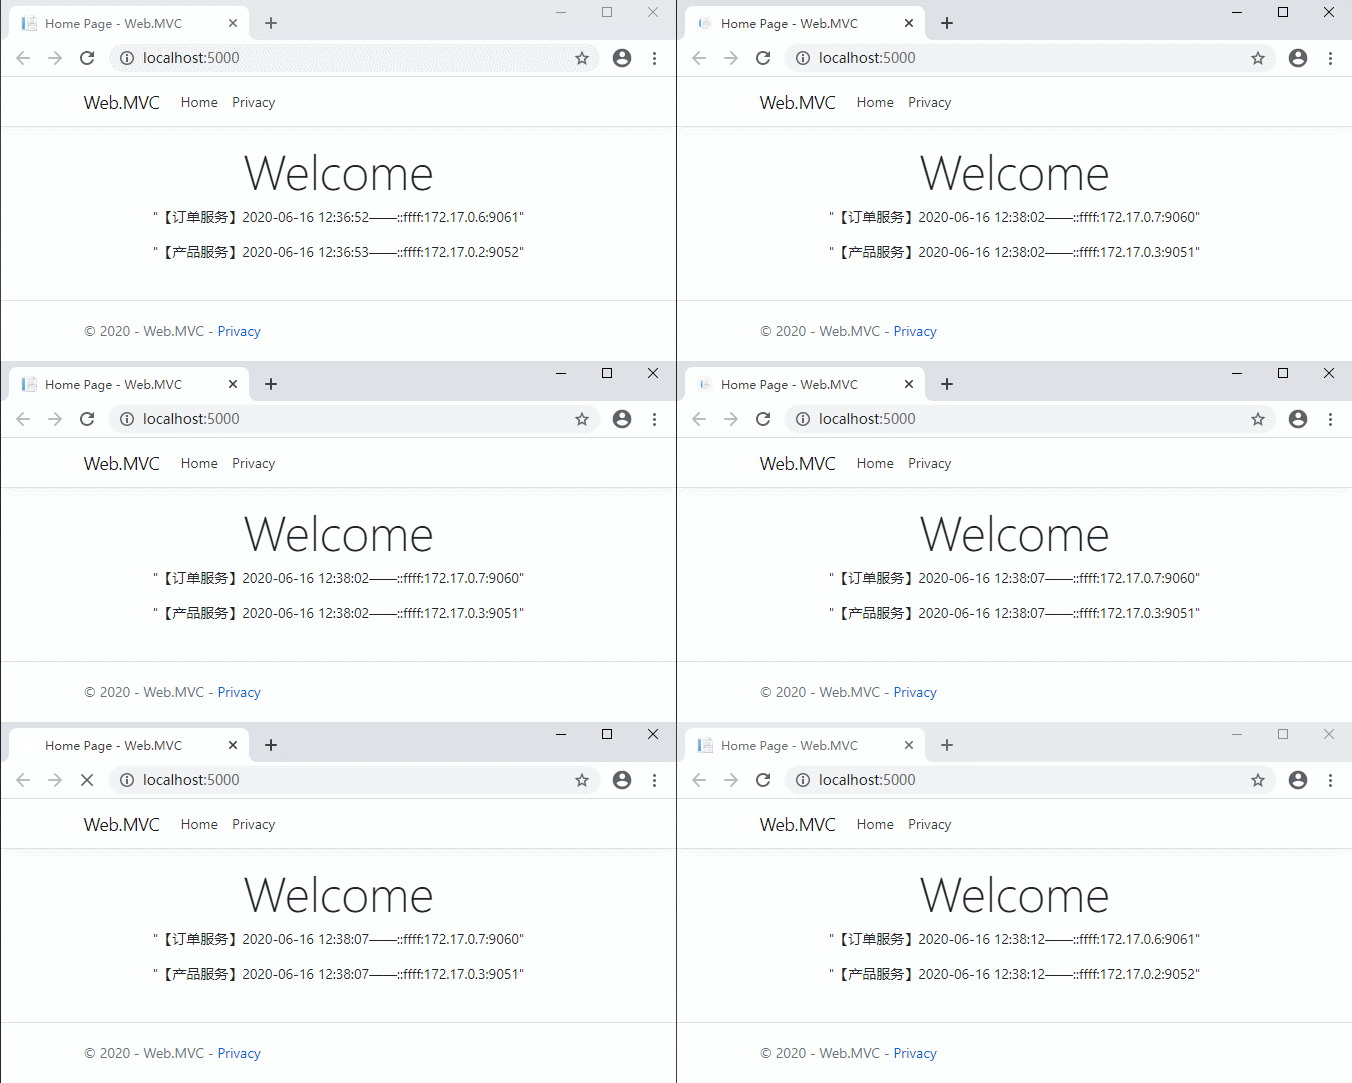
可以看到,5秒之内的请求都是同样的缓存数据。Ocelot也支持自定义缓存。
- 限流:
限流就是限制客户端一定时间内的请求次数。
继续修改配置:
{
  "Routes": [
    {
      "DownstreamPathTemplate": "/products",
      "DownstreamScheme": "http",
      "UpstreamPathTemplate": "/products",
      "UpstreamHttpMethod": [ "Get" ],
      "ServiceName": "ProductService",
      "LoadBalancerOptions": {
        "Type": "RoundRobin"
      },
      "FileCacheOptions": {
        "TtlSeconds": 5,
        "Region": "regionname"
      },
      "RateLimitOptions": {
        "ClientWhitelist": [ "SuperClient" ],
        "EnableRateLimiting": true,
        "Period": "5s",
        "PeriodTimespan": 2,
        "Limit": 1
      }
    },
    {
      "DownstreamPathTemplate": "/orders",
      "DownstreamScheme": "http",
      "UpstreamPathTemplate": "/orders",
      "UpstreamHttpMethod": [ "Get" ],
      "ServiceName": "OrderService",
      "LoadBalancerOptions": {
        "Type": "RoundRobin"
      },
      "FileCacheOptions": {
        "TtlSeconds": 5,
        "Region": "regionname"
      },
      "RateLimitOptions": {
        "ClientWhitelist": [ "SuperClient" ],
        "EnableRateLimiting": true,
        "Period": "5s",
        "PeriodTimespan": 2,
        "Limit": 2
      }
    }
  ],
  "GlobalConfiguration": {
    "BaseUrl": "http://localhost:9070",
    "ServiceDiscoveryProvider": {
      "Scheme": "http",
      "Host": "localhost",
      "Port": 8500,
      "Type": "Consul"
    },
    "RateLimitOptions": {
      "DisableRateLimitHeaders": false,
      "QuotaExceededMessage": "too many requests...",
      "HttpStatusCode": 999,
      "ClientIdHeader": "Test"
    }
  }
}
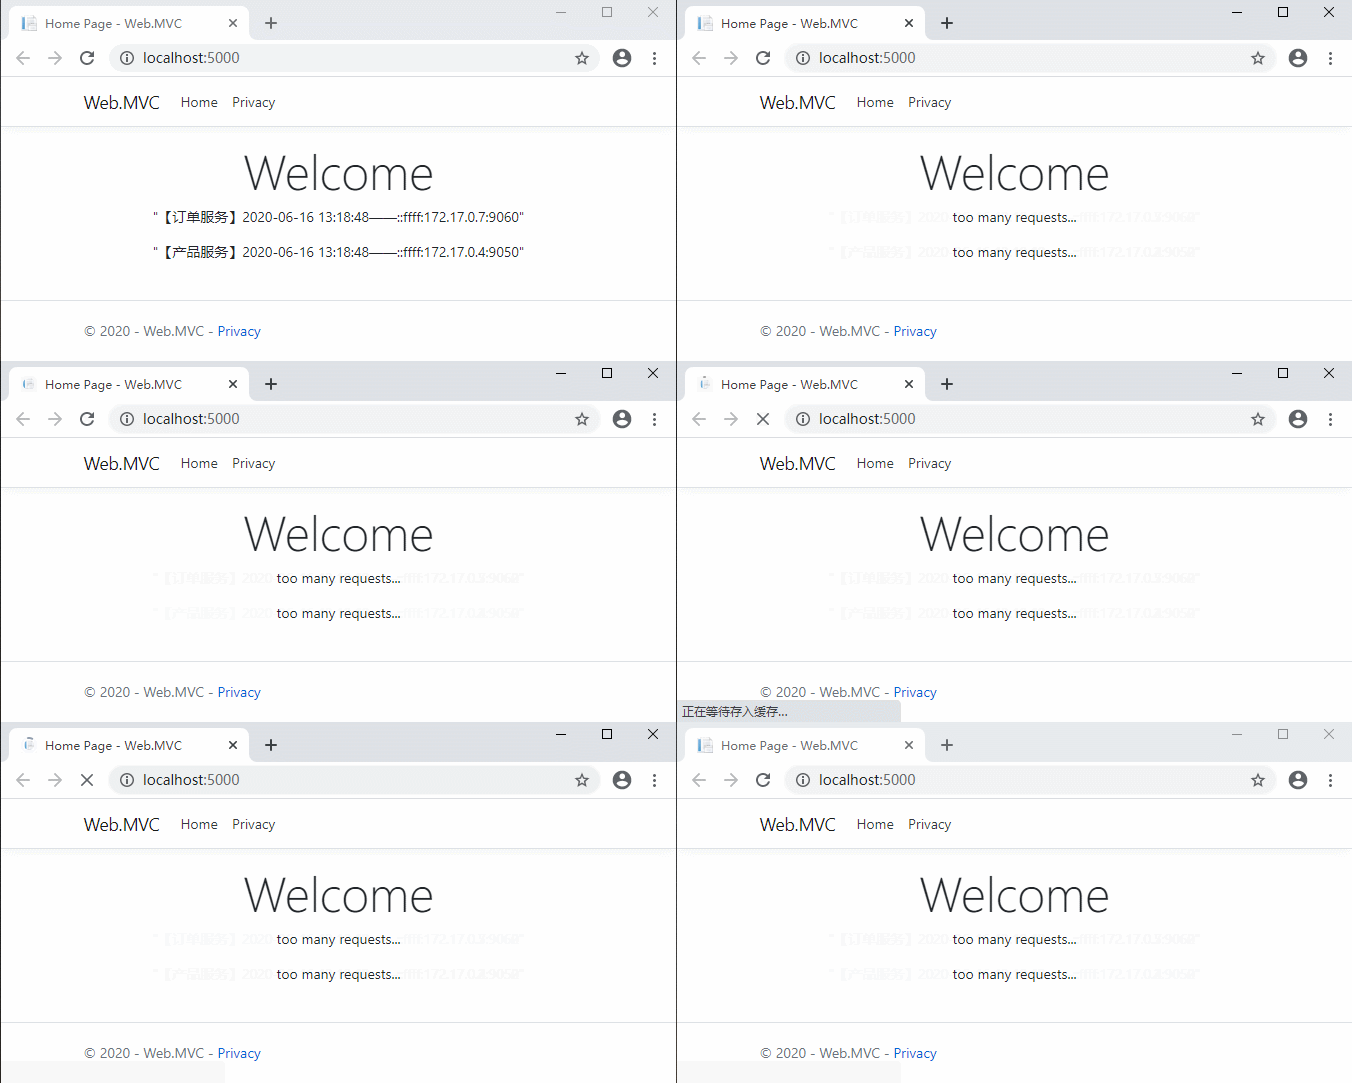
在Routes路由配置中增加了RateLimitOptions。ClientWhitelist代表客户端白名单,在白名单中的客户端可以不受限流的影响;EnableRateLimiting代表是否限流;Period代表限流的单位时间,例如1s,5m,1h,1d等;PeriodTimespan代表客户端达到请求上限多少秒后可以重试;Limit代表客户端在定义的时间内可以发出的最大请求数。
在GlobalConfiguration配置中也增加了RateLimitOptions。DisableRateLimitHeaders代表是否禁用X-Rate-Limit和Retry-After标头(请求达到上限时response header中的限制数和多少秒后能重试);QuotaExceededMessage:代表请求达到上限时返回给客户端的消息;HttpStatusCode:代表请求达到上限时返回给客户端的HTTP状态代码。ClientIdHeader可以允许自定义用于标识客户端的标头。默认情况下为“ ClientId”。
最重要的就是Period,PeriodTimespan,Limit这几个配置。
重新编译启动看一下效果:
- 超时/熔断
超时很好理解,就是网关请求服务时可容忍的最长响应时间。熔断的意思就是当请求某个服务的异常次数达到一定量时,那么网关在一定时间内就不再对这个服务发起请求了,直接熔断。
Ocelot中启用 超时/熔断 需要NuGet安装一下Ocelot.Provider.Polly:

修改Startup.cs中的ConfigureServices()方法:
//添加ocelot服务
services.AddOcelot()
    //添加consul支持
    .AddConsul()
    //添加缓存
    .AddCacheManager(x =>
    {
        x.WithDictionaryHandle();
    })
    //添加Polly
    .AddPolly();
同样的在ocelot.json路由配置中增加QoSOptions:
"QoSOptions": {
        "ExceptionsAllowedBeforeBreaking": 3,
        "DurationOfBreak": 10000,
        "TimeoutValue": 5000
      }
ExceptionsAllowedBeforeBreaking代表发生错误的次数,DurationOfBreak代表熔断时间,TimeoutValue代表超时时间。
以上的配置意思就是当服务发生3次错误时,那么就熔断10秒,期间客户端的请求直接返回错误,10秒之后恢复。
这个不太好模拟,就不演示了,应该也挺好理解的。
。。。。。。
关于服务治理的学问还有很多,不继续了。。。就到此为止吧。
想要更深入了解Ocelot的,请看官网:https://ocelot.readthedocs.io/en/latest/
或者看源码:https://github.com/ThreeMammals/Ocelot
下一篇准备说一下:事件总线。
