


内容纲要
本章我们将学习 ASP.NET MVC 模式下如何添加样式和统一的外观(布局)
添加布局
文件 _Layout.cshtml 表示应用程序中每个页面的布局
它位于 Views 文件夹中的 Shared 文件夹
打开文件 _Layout.cshtml,把内容替换成
<!DOCTYPE html>
<meta http-equiv="Content-Type" content="text/html; charset=utf-8"/>
<meta charset="utf-8" />
<meta name="viewport" content="width=device-width, initial-scale=1.0">
<title>@ViewBag.Title - 我的 ASP.NET 应用程序</title>
@Styles.Render("~/Content/css")
@Scripts.Render("~/bundles/modernizr")
<div class="navbar navbar-inverse navbar-fixed-top">
<div class="container">
<div class="navbar-header">
<button type="button" class="navbar-toggle" data-toggle="collapse" data-target=".navbar-collapse">
<span class="icon-bar"></span>
<span class="icon-bar"></span>
<span class="icon-bar"></span>
</button>
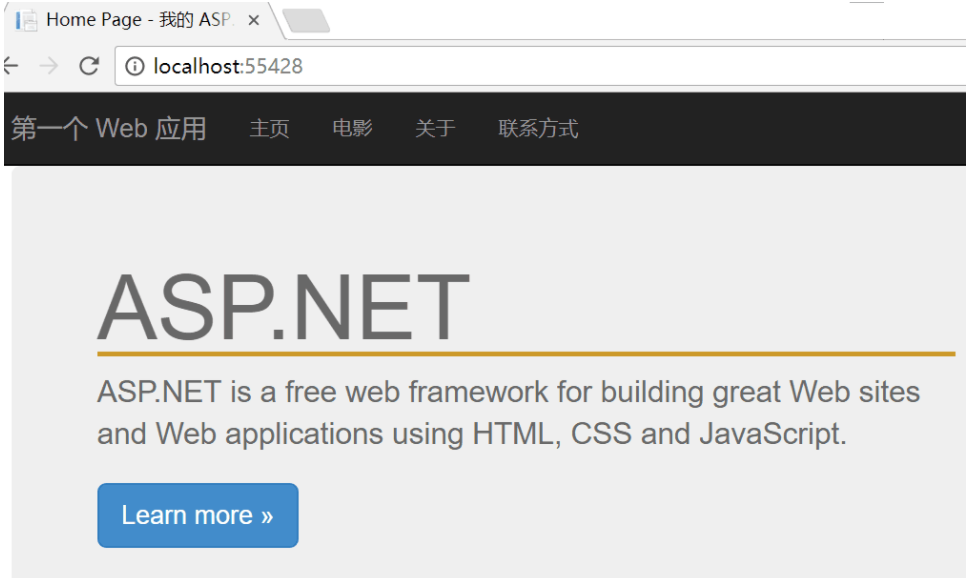
@Html.ActionLink("第一个 Web 应用", "Index", "Home", new { area = "" }, new { @class = "navbar-brand" })
</div>
<div class="navbar-collapse collapse">
<ul class="nav navbar-nav">
<li>@Html.ActionLink("主页", "Index", "Home")</li>
<li>@Html.ActionLink("电影", "Index", "Movies")</li>
<li>@Html.ActionLink("关于", "About", "Home")</li>
<li>@Html.ActionLink("联系方式", "Contact", "Home")</li>
</ul>
</div>
</div>
</div>
<div class="container body-content">
@RenderBody()
<hr />
<footer>
<p>© @DateTime.Now.Year - 我的 ASP.NET 应用程序</p>
</footer>
</div>
@Scripts.Render("~/bundles/jquery")
@Scripts.Render("~/bundles/bootstrap")
@RenderSection("scripts", required: false)
HTML 帮助器
在上面的代码中,HTML 帮助器用于修改 HTML 输出
- @Url.Content() - URL 内容将在此处插入
- @Html.ActionLink() - HTML 链接将在此处插入
在本章接下来的教程中,我们将学习更多关于 HTML 帮助器的知识
Razor 语法
在上面的范例中,下面这些代码是使用 Razor 标记的 C#
- @ViewBag.Title - 页面标题将在此处插入
- @RenderBody() - 页面内容将在此处呈现
你可以在我们的 Razor 基础教程 中学习关于 C# 和 VB(Visual Basic)的 Razor 标记的知识
添加样式
应用程序的样式表是 Site.css,位于 Content 文件夹中
打开文件 Site.css,把内容替换成
body{font: "Trebuchet MS", Verdana, sans-serif;background-color: #5c87b2;color: #696969;}
h1{border-bottom: 3px solid #cc9900;font: Georgia, serif;color: #996600;}
#main{padding: 20px;background-color: #ffffff;border-radius: 0 4px 4px 4px;}
a{color: #034af3;}

/* Menu Styles ------------------------------*/
ul#menu{padding: 0px;position: relative;margin: 0;}
ul#menu li{display: inline;}
ul#menu li a{background-color: #e8eef4;padding: 10px 20px;text-decoration: none;line-height: 2.8em;
    /*CSS3 properties*/
    border-radius: 4px 4px 0 0;
}

ul#menu li a:hover{
    background-color: #ffffff;}

/* Forms Styles ------------------------------*/
fieldset{padding-left: 12px;}
fieldset label{display: block;padding: 4px;}
input[type="text"], input[type="password"]{width: 300px;}
input[type="submit"]{padding: 4px;}

/* Data Styles ------------------------------*/
table.data{background-color:#ffffff;border:1px solid #c3c3c3;border-collapse:collapse;width:100%;}
table.data th{background-color:#e8eef4;border:1px solid #c3c3c3;padding:3px;}
table.data td{border:1px solid #c3c3c3;padding:3px;}

.body-content {margin-top:51px;}
_ViewStart 文件
Shared 文件夹(位于 Views 文件夹内)中的 _ViewStart 文件包含如下内容
@{Layout = "~/Views/Shared/_Layout.cshtml";}
这段代码被自动添加到由应用程序显示的所有视图
如果你删除了这个文件,则必须向所有视图中添加这行代码
在本教程接下来的章节中,我们会学习到更多关于视图的知识
运行应用程序
选择 Debug,从 Visual Studio 菜单中启动调试 Start Debugging(或者按 F5)
我们的应用程序将显示如下