前面几章节中我们已经介绍和使用过 Startup 类,包括
- 在创建新项目时修改了
Startup类中的Hello World修改返回值 - 上一章节中讲解
Program.cs时讲到Program类会实例化Startup类
但 Startup 能做的不仅仅是这些,可以说 ASP.NET Core 中大大小小的各个组件和中间件都会和 Startup 类打交道。
但一个章节又不能全部讲完。于是乎,这章节我们只讲解最重要的几个东西
以前的版本
如果你曾经使用过 ASP.NET,那么你可能会期望
- 看到一个 global.asax 文件,可以在启动 Web 应用程序期间编写代码来执行的一个地方
- 看到一个 web.config 文件,用来包含应用程序需要执行的所有配置参数
在 ASP.NET Core 中,这些文件全部消失,取而代之的是使用 Startup.cs 加载配置和启动代码
Startup.cs 文件中有一个 Startup 类,在这个类中可以配置应用程序,甚至配置配置源
默认的 Startup.cs 文件内容
Startup.cs 文件中默认的内容如下
using System;
using System.Collections.Generic;
using System.Linq;
using System.Threading.Tasks;
using Microsoft.AspNetCore.Builder;
using Microsoft.AspNetCore.Hosting;
using Microsoft.AspNetCore.Http;
using Microsoft.Extensions.DependencyInjection;

namespace HelloWorld
{
    public class Startup
    {
        // 该方法在运行时被调用。
        // 可以使用该方法将服务添加到容器中
        // 更多信息配置应用程序的信息,可以查看 https://go.microsoft.com/fwlink/?LinkID=398940
        public void ConfigureServices(IServiceCollection services)
        {
        }

        // 该方法在运行时被调用
        // 可以使用该方法来配置 HTTP 请求管道
        public void Configure(IApplicationBuilder app, IHostingEnvironment env)
        {
            if (env.IsDevelopment())
            {
                app.UseDeveloperExceptionPage();
            }

            app.Run(async (context) =>
            {
                await context.Response.WriteAsync("Hello World!");
            });
        }
    }
}
Startup 类
Startup 类可以用来定义请求处理管道和配置应用程序需要的服务。
Startup 类必须是公开的,且必须包含以下两个方法
- ConfigureServices() 方法
public void ConfigureServices(IServiceCollection services){}ConfigureServices() 方法用于定义应用程序所需要的服务,例如 ASP.NET Core MVC 、 Entity Framework Core 和 Identity 等等关于 服务 我们会再接下来的章节中详细介绍
- Configure() 方法
public void Configure(IApplicationBuilder app, IHostingEnvironment env){}Configure() 用于定义请求管道中的中间件关于 请求管道 的概念,我们会在接下来的章节中详细介绍
项目配置
Startup 类中的 Configure() 方法用于配置和构建 HTTP 请求管道的地方
该怎么理解这句话呢?
其实也就是说,Configure() 方法可以用来定义我们的应用程序如何响应请求
对于任意网址,默认情况下它只会输出 Hello World!


如果我们希望应用程序的行为不同,我们需要在 Configure() 方法中添加其他代码来更改管道
例如,如果我们想要为诸如 index.html 之类的静态文件提供服务,则需要向 Configure() 方法添加一些代码
例如,如果想要给 ASP.NET MVC 控制器发送错误页面或路由请求,都需要在这个 Configure() 方法中做一些工作
动态响应内容
默认情况下,我们为每个请求都提供了一个硬编码的响应 Hello World!
接下里来我们不再使用硬编码,而是从某个组件中加载字符串来响应的每一个请求
- 在解决方案管理器的 HelloWorld 项目上点击右键,选择 添加 -> 新建文件如果你的电脑是 Windows ,则是 添加 -> 新建项
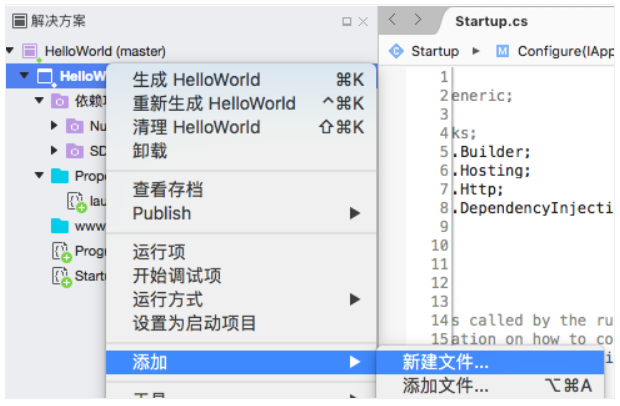
- 在新建文件对话框中,选中左边的 Web,然后选中右边的 空 JSON 文件如果你的电脑是 Windows ,则是先选中 ASP.NET Core 下的 常规 ( Genreral ) 然后选中 JSON 文件

- 在名称中输入 AppSettings.json,然后点击右下脚的 新建 按钮,添加一个 AppSettings.json 文件如果你的电脑是 Windows ,则是点击 添加 按钮

- 然后双击 AppSettings.json 打开文件,输入以下内容
{
    "message":"Hello World!\n你好,简单教程,你的网址是 51aspx.com 吗?"
}- 双击打开
Startup.cs文件,在Startup类中添加一个可读写属性 - 修改
Startup类,添加Startup()构造函数,加载 AppSettings.json 文件,然后构建配置项
public IConfiguration Configuration { get; set; }- 最后修改
Configure()方法,从配置项中读取message并作为响应的内容
public void Configure(IApplicationBuilder app, IHostingEnvironment env)
{
    if (env.IsDevelopment())
    {
        app.UseDeveloperExceptionPage();
    }

    app.Run(async (context) =>
    {
        var msg = Configuration["message"];
        await context.Response.WriteAsync(msg);
    });
}
修改完成后的代码如下
Startup.cs
using System;
using System.IO;
using System.Collections.Generic;
using System.Linq;
using System.Threading.Tasks;
using Microsoft.AspNetCore.Builder;
using Microsoft.AspNetCore.Hosting;
using Microsoft.AspNetCore.Http;
using Microsoft.Extensions.DependencyInjection;
using Microsoft.Extensions.Configuration;

namespace HelloWorld
{
    public class Startup
    {
        public Startup()
        {
            var builder = new ConfigurationBuilder()
                .SetBasePath(Directory.GetCurrentDirectory())
                .AddJsonFile("AppSettings.json");
            Configuration = builder.Build();
        }

        public IConfiguration Configuration { get; set; }

        // This method gets called by the runtime. Use this method to add services to the container.
        // For more information on how to configure your application, visit https://go.microsoft.com/fwlink/?LinkID=398940
        public void ConfigureServices(IServiceCollection services)
        {
        }

        // This method gets called by the runtime. Use this method to configure the HTTP request pipeline.
        public void Configure(IApplicationBuilder app, IHostingEnvironment env)
        {
            if (env.IsDevelopment())
            {
                app.UseDeveloperExceptionPage();
            }

            app.Run(async (context) =>
            {
                var msg = Configuration["message"];
                await context.Response.WriteAsync(msg);
            });
        }
    }
}
点击绿色三角形运行项目 ( 如果项目已经在运行则直接刷新浏览器即可 )
刷新浏览器,显示结果如下

